felt luminary

Sunday, October 21, 2012

An Autumn Table Runner


 I'm so excited to have finished this table runner, I just love how it turned out!  I have been working on this for the past week and put close to 25 hours into it.  The pictures above and

here on the left are the finished piece.  The entire piece was wet felted and then I went in and stitched in the details using free motion embroidery


 First I made sheets of partial felt using an assortment of fall colors and cut out the leaves, berries and pomegranates.  I had never used commercial pre-felts before and decided they would make a good base for my runner.  On top of those I laid out four layers of merino wool and then laid out my design, below.  For the black edge I made my own black partial felt and folded it over the edge of the wool to get a nice straight edge.  I then wet the whole thing down and with the netting still over the design I worked by hand where I had put down my partial felt cut outs to ensure they would stay in place when I was rolling it out in the bubble wrap.  I rolled the piece from every edge until it was well felted, no fiber movement. 


The picture here on the right is the fulling part.  This is where the shrinkage comes from.  I roll the work on itself and work it from every edge as well.  I'm constantly pulling and tugging at the edges to keep them straight other wise they would be all wavy.  It's important to keep your work nice an wet during this stage. 


This is what the piece looked like when I was done fulling it.  It looked pretty good but I wanted some of the details to really pop and have more detail so I did free motion embroidery on it when it was dry.  I learned this technique in a class I took from Lisa Klakulak and it has changed the way I now felt.  It's amazing the texture & definition you get with this stitching!


Here is an example how stitching adds depth and texture to a leaf.  This first picture is a leaf after the piece has been completed and dry.  The shade of the leaf and the background color kind of blend together and it doesn't really stand out.


This is the leaf after outlining it.  Already it begins to pop away from the background and the edges gain definition.  One thing about the free motion embroidery is that is rather unforgiving on felt.  Once your stitches are down they stay there, ripping out rips up the felt and makes it fuzzy.  Take it slow and practice lots!  Spend time choosing a thread color too, a slightly darker shade stands out more.

  Here is the finished leaf with all the veins stitched in.  We have some trees who's leaves are turning such a bright yellow now, I think they are a kind of sycamore.  I patterned the veins on my leaves by closely studying the veins on it's leaf first.  Because the leaf is three layers of wool placed on a base of four layers of wool, when you stitch on it, it makes these great hills and valleys of texture on the leaf. 
I just know another piece similar to this is in my immediate future, maybe a wall hanging.  I haven't decided if I'm going to put this up for sale on my Etsy shop.  I'm not sure I want to part with it and I don't think I could sell it for a price that makes all the work I put into it worth it for me.  I might just try and see what the reaction is.......  We'll see.  

Thanks for checking out my blog site.  Hope you enjoyed this piece!
Terry

Wednesday, September 5, 2012

Felt Knitting Project Vessels

 I've made these for myself for awhile now to hold my knitting projects in.  I always have a few projects going at once and it's a great way to keep my projects separate and neat.  No balls of yarn on the floor or mixed up in a bigger basket.  When I want to take a project with me I just put it in my purse and everything stays in it's place, and it's made of my favorite textile, felt!  I brought a project that was stored in one of these to a yarn shop because I was stuck, one of the gals in the shop asked me if I sell them on my Etsy site.....I said no, but what a great idea!  There are tons of project bags for knitting on Etsy but none are made of felt, so I thought I would add these to my shop.  The two bags above are the ones I just made for my shop.  We'll see if the Etsy knitters approve!

The photo here on the left and below is the larger black bag in the making.  I used Malabrigo's Rasta yarn for the stripes on the outside.  I LOVE that stuff, it just melts so easily into the felt.   I've used it on merino, merino, silk 50/50 blends and on corriedale.  I buy it online from a great yarn shop in San Francisco called Imagiknit, they always seem to have it in stock. 

First I laid down four layers of the dark pink part of the way down the template, wrapped it in plastic and then did four layers of the black.  The template was 14" tall and 13" wide, the finished piece was 8 1/2" tall and 7" across; that's a good amount of shrinkage.  
I use this size for larger knitting projects, in the top picture there are two skeins of yarn and the back of a sweater inside.                               

This photo on the left is the small bag that I usually use for sock projects.  It's hard to tell here because it's wet but the outside layer is dark purple merino, the top layer is chartreuse merino and around it is some beautiful homespun art yarn.  I used an old washing soap bottle to help form the bottom of this one.  It was made the same as the big one. To stabilize these while they are drying I put the bottle in the small one and stuffed the big one with bubble wrap.  This helps the vessel keep it's shape during drying and once dry it will keep that form.  The small vessel in the top picture has a 440 yard ball of yarn inside and a partially completed sock.
  
Both of these have inner pockets to hold your knitting needles and there is another pocket in the larger one to hold a measuring tape, scissors, or whatever you need.  They were so fun to make I think I'll do a few more!  I love coming up with new ways to mix colors & decorate them.  I want to do some machine free motion stitching on them too but those will probably be for me, it's so time consuming I don't think I could get a reasonable price for them.  You can find them on my Etsy shop called ifeltlikeitbyterry.


Thanks for stopping by!    Terry

Wednesday, August 1, 2012

Summer Felting Class

  This summer I treated myself to a week long class taught by Lisa Klakulak at the Mendocino Art Center: Compositions In the Felt Medium.  This was my fifth class with her, and as in years past, it was amazing, I always learn so much from her!  Lisa is the artist behind Strongfelt, a body of art work that is truly original and of the highest quality, honestly the best felt I have yet to see.   If you aren't familiar with her work google Strongfelt to see what I'm going on about-it's so fun!  Lisa teaches classes around the world, mostly in the US, if you really want to educate yourself on how to make quality felt check out her teaching schedule.  I am not going to elaborate on how we developed the images or her technique, that's part of her livelihood!  I just want to share what I did......I was so jazzed by the results!
  She taught us how to create a very distinct image with defined lines.  Our first exercise was to draw a California poppy then to re-draw it in a way that we could recreate using felt.  Above right was my interpretation of the poppy I had and how I translated that to felt.  Below left is what it looked like after felting it. 


On the lower right is the poppy after I felted it to a background with some netting fused on it.


   One thing you will notice about Lisa's work is the intricate detail she gets using free motion embroidery with a machine.  We learned how to embellish our work and really make it pop using the machine.  Below is my poppy, felted, then the detail is the stitching using free motion embroidery.  I had so much fun doing this, it's mesmerizing once you get going!


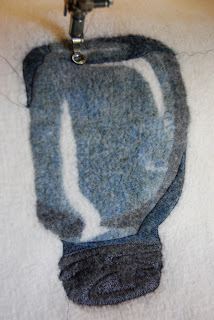
After doing the poppy we were able to choose anything we wanted and try to translate it into felt.  I had a blue glass mason jar with me that was holding my granola, you can kind of see it on the left in the upper corner....out with the granola and I began sketching.  I wanted to try to capture the light reflecting off of it and some of the more subtle shaded details.  The photo on the left is my lay out before felting. 


 Here on the right I'm starting to stitch.  You can kind of see the different shades I was going for. 
Below is my finished blue glass mason jar.  I am so happy with it!  I just can't get over how much the stitching adds to the finished piece.....I feel a new obsession coming on......


Monday, May 7, 2012

Felting & Bees...

What do bees have to do with felting... ......you can eat the honey to give you energy to roll all that felt or you could felt in the light of a beeswax candle.....but otherwise, not a lot!  This is my newest hobby that I do with my husband and I wanted to share it with my Mom here on the blog, and others who may be curious too.  This is our first bee hive, the picture above is how the bees get delivered, in a big box with screen around it.  Have to admit I was a bit hesitant to put this in an enclosed car and drive it home but they are very secure in there.  It's about three pounds of bees, that's equal to about 10,000 bees!  You can't see her but the queen is in a smaller box in the center of the cluster of bees. 
You have to carefully & quickly open the box and remove the queen.  Here she is in her small box, left, rubber-banded to a frame in the hive.   She has to stay here for three days while the workers get used to her scent-she is establishing her "kingdom".  If you let her out immediately they would all cluster around her and kind of love her to death, literally.  While she is in the box the bees will feed her a substance they make called royal jelly that gives her the energy and nutrition to lay all those eggs.  The whole hive is built around your queen, she lays eggs that make more worker and nurse bees to attend her and keep the hive working.  The whole bee society is really fascinating once you get into it!  And it's pretty much an all female society!  All the worker, gatherer and nurse bees are female, there are maybe only 10-20 male bees, called drones, and their only job is to have sex with a queen bee from any hive-once they mate though - they're history :(

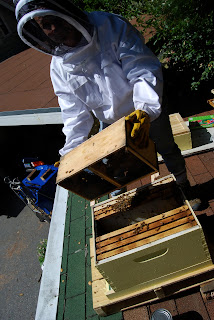
Now you have to get the bees from the box into the hive....there is a 6" inch round hole in the top and you have to just shake the bees from the box into the hive.  Here I am in my oh so attractive bee jacket shaking the bees into the hive.  The first few dumps the majority of the bees go down into the hive....the rest take some gentle coaxing.  What a sight it was to see thousands of bees flowing into the hive!  A few hundred remained in the box which we placed in front of the hive opening (below) and all of them made it into the hive.  They follow the scent of the queen and go inside.
They are now all in the hive and busy making, we hope, honey comb for the queen to lay her eggs in and for the worker bees to start making honey.  At first you need to feed them a sugar syrup and pollen patties until they get established.  It takes 7 pounds of nectar for them to make one pound of wax comb!  When you think of how little pollen one bee can carry back to the hive and they need 7 pounds of it just to start making the comb.....pretty amazing little creatures, they could use a little help at first.  In the picture with the queen attached to the frame; it's a wooden frame where we have inserted panes of beeswax foundation that have the shape of the comb imprinted on them, this helps the bees get started and allows for an organized hive that we humans can inspect for brood (baby bees) and honey production. 
Below are just some pics of the bees once they got put in the hive, our hive with the box in front and bees coming and going.  We were so jazzed with this whole process and just having a hive that we ended up getting a second hive going only this second hive has bees that were caught from a swarm which we got from a great lady, Kim, with the Santa Cruz Bee Guild. So now there are two hives atop of our wood shed and on day two they are all doing great, returning to the hive loaded with pollen.  You go girls!!


Saturday, April 21, 2012

New Leather & Felt Boots

 What else would a felter be doing at 1am....listening to Jackson Browne in front of the fire while sitting on the floor with cold, wet felt wrapped around their feet making another pair of boots.  While it definitely isn't warm and cozy now it will be once these babies are dry and ready to wear.  A few blogs back I did a bit about a pair of boots I made and then dyed.  I didn't think I would need another pair of felt boots for some time....then I saw these soles on Etsy!  Had to have them and had to make a pair of boots to go in them.  (yes, I have a slight shoe issue-the funkier the better!) They come from an Etsy shop called "linhood" and are made by Eric Gonzalez.
http://www.etsy.com/shop/linhood?ref=top_trail
Usually he sells them with the felted boots but he was kind enough to sell me the soles separately.  I was so jazzed the day the arrived!

I decided to make the boots for my new soles out of a wool I just discovered called CVM, it says it's from a breed called Romeldale which is a cross between Romney and Rambouillet and it is the natural brown; it was so soft when it felted up!  I got this wool from another great Etsy site, Woolgatherings.  They carry an incredible selection of natural and hand dyed wools, this is where I get my white superfine & natural merinos from as well as other goodies.  Check them out.
http://www.etsy.com/shop/woolgatherings

 I made a bag out of the CVM to test it out and it felted and fulled up great......but not these boots!  It's taken me almost 2 hours of just rolling in the bubble wrap to get them mostly felted and then I did some hand rubbing.  Another few hours to full them, then onto the floor to get them fitted to my foot.  It's possible that I laid the wool out thicker since they were for boots...?  I have this great tool, we just call it a felting & fulling tool, that I used to get the boots to fit my feet and it made such easy work of it.  It has these ridges up and down it and since they have the glaze on them it won't rip up your felt like a washboard can.  I did a blog piece on this tool a few posts back, you can get one from my friend Carin Engen, you guessed it-another cool Etsy shop- CarinEngenFiberArts, she carries the felting tools as well as some of my favorite hand dyed wools and silk;
http://www.etsy.com/listing/86147074/felting-and-fulling-tool


The foot of the template measures 16" across and the finished boot is 9", that's a lot of shrinkage!   Now the boots are drying, I can't wait to see how they look in their new leather soles......


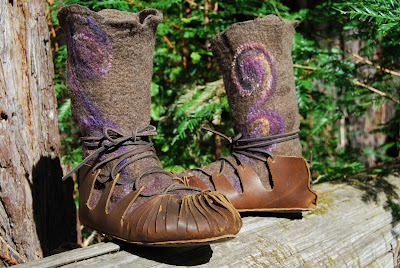
Here are my finished felted boots with their leather soles.  I've been wearing them around here for a couple of days now and they are incredibly comfy!  The wool is soft but hasn't begun to stretch at all, I think they'll be pretty durable. I realize they aren't to everyone's liking (my sister's not a huge fan....) but I love 'em!

Friday, March 9, 2012

A New Form of Felt for Me


For the past few weeks I've been working on making felt cuffs, or bracelets; cuff is the "in" word for them now.  Over the past couple of years I have taken numerous classes from a master felter, Lisa Klakulak of Strongfelt.  She is an amazing artist and an equally amazing teacher.  She teaches technique mostly, you don't come away from a class with a purse or some object but you do have a wealth of information on how felt works and different ways to manipulate it to reach a certain
outcome.  If you want to see some of the most awesome felt ever made you owe it to yourself to check out her gallery at: http://www.strongfelt.com/

These cuffs have been the perfect project for me to practice combining some of the techniques I have learned.  Trying to get straight edges, free motion embroidery, felted rings, the use of partial felts, and using plastic resists; I've used all of these techniques in these cuffs.
The purple cuff at the top was so much fun to do the free motion embroidery on.  I love
the pattern that developed over the whole thing.  I made a ring out of felt then attached it to the end of the cuff before felting it.  The white cuff on the upper right also has free motion embroidery on it.  I found a cool old vintage belt buckle made out of bone and ended up sewing it on the front, I was going to put it on the Etsy site to sell it but I just loved it so much I decided to keep it!


I'm really happy with this black cuff  pictured above.  Here I
made a sheet of partial felt in gold and cut them into circles and felted them onto a base of black.  Through the felting process they fuse together.  By stitching around the circles it caused them to raise slightly, I used a variegated thread.  Then I stitched red coral hishi beads in the center


Now this white one here on the left....I'm still not sure if I really like this one.  It kind of reminds me of how oldfashioned sleeves used to have lace hanging down.  It was an experiment with kid mohair locks.  I ended putting it up on the Etsy site, like my sister says, you'd be surprised what people like!
(a note a few weeks after this post.....this white cuff has gotten the most "favorites" on Etsy !!! People really seem to like it )


The black and bright multicolored cuff here on the left I'm really happy with too.  Here I used a plastic resist and made a felt loop for a closure in the back. I did some hand stitching along the folded back sides.  To be picky the edges could have been smoother......


Not all the cuffs I made have turned out!  These are just the better ones.  Like anything, there are going to be a few failures but I have learned from each one of those.  I'm keeping good notes so I don't repeat the same mistakes.

All of these, except the white one, are for sale on my Etsy site, ifeltlikeitbyterry.  It will be interesting to see what sells and what doesn't.  When I make things I usually make something that I would like to wear, I don't really want to start guessing what others may want, that would put a damper on the creative process, for me anyway.

Tuesday, February 14, 2012

Not A Bad Mornings Work


I have been putting off doing the finishing work on more that a few items.  This morning I wouldn't let myself felt until I got most of this done.  My finished projects are whats pictured here. 


I had made this felt collar three months ago, all it needed was a button and a button hole.  I decided to use this black vintage button, and it only took ten minutes!  I am such the procrastinator!

I made a few of these white merino cuffs with Wensleydale locks on the edges, I think they look so pretty, like natures lace.  This one on the right has some pearl buttons and is for my lovely daughter-in-law, Alex.  I made two more that I may put on the Etsy site or I may give them to my Aunt to wear to the Renaissance Fair.


This is a purple cuff that I had nuno felted some silk onto then put it in a dye bath of Brazilwood.  I left it in a little to long and the silk totally disappeared and turned purple.  So, I've tried to salvage it and did some free motion embroidery on it.  Still not sure if it's up to selling standard.  I do like the design though. 

Below is just a pic of some of my favorite embellishment treasures.  I am an avid collector of buttons and tend to like shell and bone ones the best.  If any one knows what the name or the use is for the white pearl circles on the bottom with the two tiny holes at the very top, I would love to find out!

Monday, February 13, 2012

The Making of a Pillow

   I've had this idea in my head for a few weeks for a pillow cover and finally got a chunk of time to make it.  The photo on the right is what it looked like dry, before I wetted it out.  I laid down silk on the dark brown base then put these swirls of merino, bamboo, and wool yarn on top.  Part of what I love so much about felting is how different the finished product ends up looking like.  You have to be able to imagine the final outcome.  I almost always learn something new with every project I do.
I laid down four layers of dark brown wool in a cross hatch for the base .  The more layers you put the less it will shrink.  I wanted this to shrink up quite a bit because I love how the silk crinkles up when you get a lot of shrinkage.  The photo here on the right is what it looked out after I wet it out and rolled it once in the bubble wrap.  
 This is just a close up of one of the circles after wetting it out.  The colors compress and take on such a different look.  The picture below are the colors of roving I used to make the swirls.  I blended some of them using hand carders to get my own colors. 
The finished product is the large pic at the bottom.  The colors are actually richer than the picture, I just love the outcome.  It started out being 28 " inches square when dry.  After fulling it, shrinking it,the
 finishes size is 16" square.  I probably could have gotten it smaller but I wanted it to fit on the back of my leather chair and it's the perfect size now. 
My mission today is to find some fabric to back it with, if I don't find anything I may just make a large piece of brown felt for the back.